Baking, what do I say about it?! If there is anything in cooking that I don’t feel confident to even try then that is BAKING. Yes, I have had so many failed attempts at baking that I have accepted I can’t be a baker ever. But wait you must be thinking if I can’t bake then why are you on my blog for a cake recipe? Oh well trust me you are not on a wrong blog post.
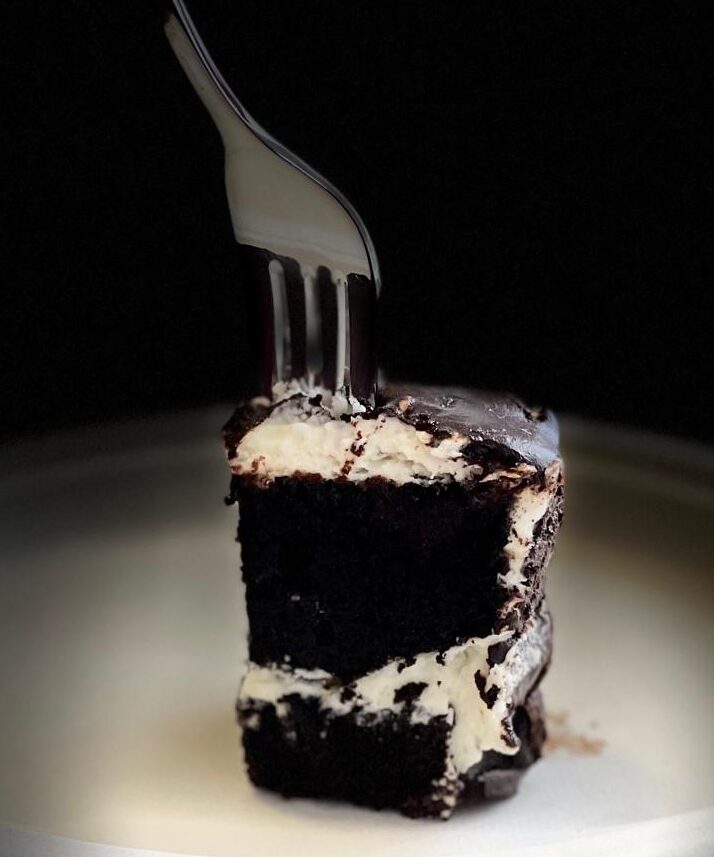
So if there is anything that I can bake with confidence and a certainty then it is this OREO CAKE. This may not be store bought quality but trust me it is one damn good tasting cake. It is intensely chocolaty, moist and full of delicious frosting. And how is this cake recipe better than a bazillion other chocolate cake recipes on the internet? Well a non-baker like me can bake an absolutely delicious cake using this recipe. So if you are a non-baker like me or looking for a simple recipe that does not involve a ton of ingredients then stay on this page and try my OREO Cake recipe.
The first best thing about this cake is that it is made from oreo cookies. Now oreo already has flour, chocolate, sugar, fat (oil/butter) in it, so we don’t need to put any of these things separately in the cake batter. One packet of oreo and we are sorted for at least 5 ingredients that go in a normal chocolate cake. In fact if we skip frosting then the chocolate sponge can be made from just 4 ingredients- oreo, milk, baking soda and instant coffee powder.
Less ingredients is a huge perk of this recipe since if you are a non-baker like me then you know we don’t usually have all baking ingredients in our pantry. But I am sure we have oreo as a pantry staple. Another perk of this recipe is that it is an eggless cake. Normally eggless cake recipes call for egg substitutes which again are not mostly pantry staples. So if you do not eat eggs and are a non-baker like me then this cake recipe is the most appropriate one.
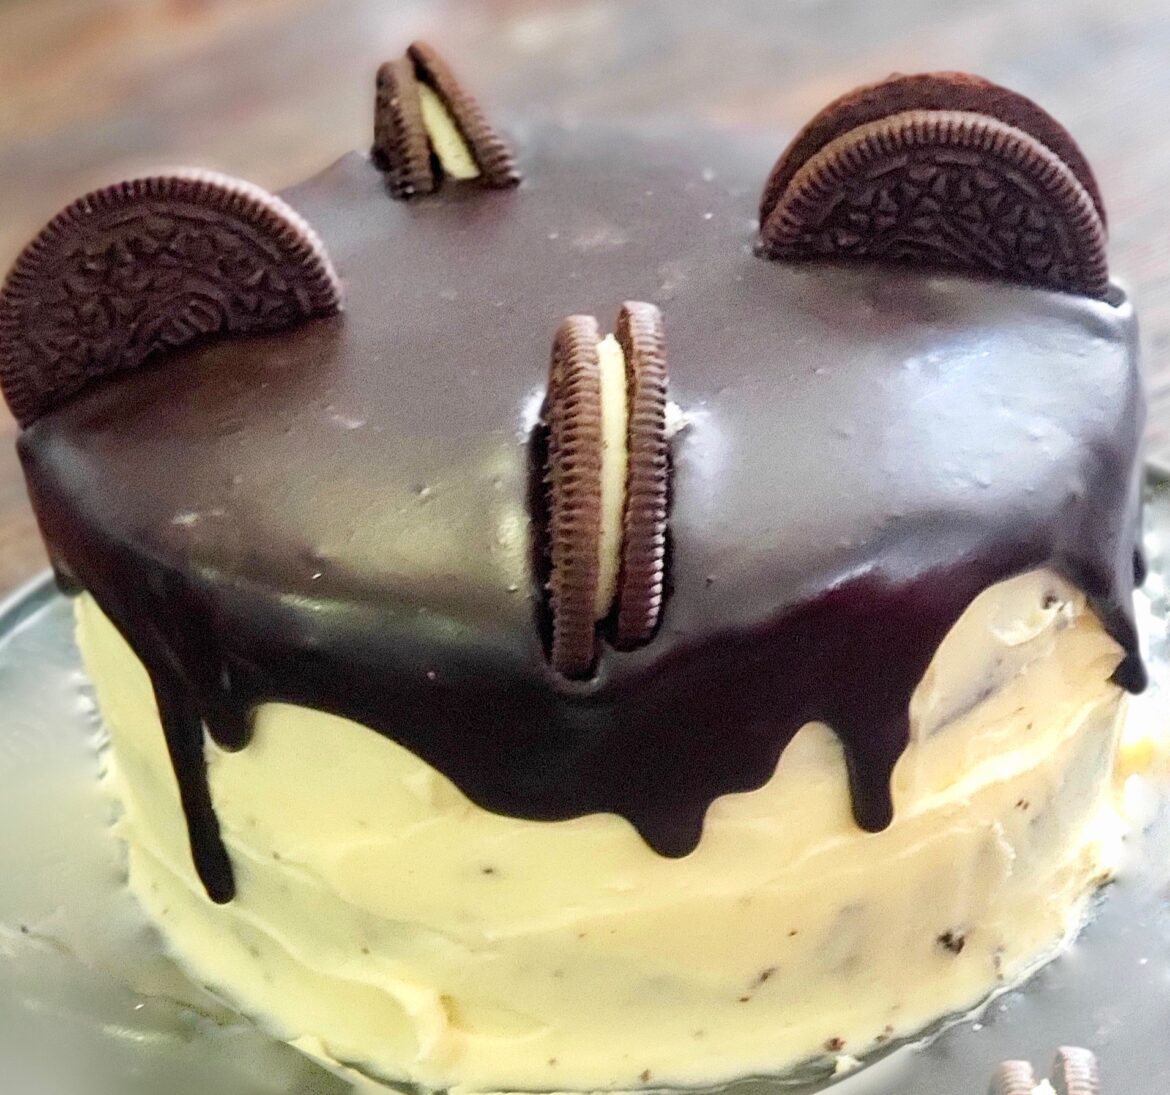
Now let’s talk a little about the cake frosting part. I am not good at it clearly. But I got this wonderful trick of hiding your frosting irregularities. So I cover the cake with cream cheese frosting and level it to the best of my abilities. Then the trick is I cover the frosted cake with chocolate ganache and this gives a silky shiny look to the cake. Once the cake is covered with ganache, it is like a clear canvas. You can decorate the way you want. You can dust it with powdered sugar or cocoa powder, add fresh fruits on top, use sprinkles or m&m’s, literally anything that you think would work. Personally I like to keep it simple so I just top it with some fresh strawberries.
For the filling of the cake, I like to use cream cheese frosting as it goes very well with the chocolate sponge. I share my recipe of cream cheese frosting here but you can definitely use store bought frosting. Lastly, I make chocolate ganache using milk and butter. Usually chocolate ganache is made from chocolate and cream. As I mentioned I usually do not make desserts often so I do not have cream on hand. So I make it using milk and butter and trust me there is no difference in the taste.
In this blog post I share my Oreo cake recipe that also has tips for a soft cake and frosting tricks within the recipe steps. And ofcourse if you are wondering how I can share tips when I am not confident about baking. Well these are some things that I learned from my sister who knows a thing or two about baking and she helped me make a pretty presentable cake. So I highly recommend trying this cake recipe. Also if you are a non-baker like me then please share with us if this recipe worked for you or not.
Makes : 6 inch cake | Prep Time : 15-20 minutes | Baking Time : 25-30 hours | Total Time: 55-60 hrs
Ingredients to make cake sponge:
- 1 packet oreo cookies (405 gms)
- 1 cup whole milk
- 1 tsp baking soda
- 1 tbsp milk
- ¼ tsp coffee powder(optional)
Ingredients to make cream cheese frosting:
- 8 oz cream cheese
- ½ cup unsalted butter
- 2 tsp vanilla extract
- 1.5 cup confectioners sugar
Ingredients to make chocolate ganache:
- 2 tbsp unsalted butter
- ¼ cup whole milk
- ½ cup dark chocolate chunks
Steps to make cake sponge:
- Preheat the oven at 375°F.
- Take a 6” baking pan and grease it properly or use a parchment paper. I am using a heart shape baking pan but you can use any shape pan.
- Crush all the oreo cookies using a food processor. We want the cookies to be in a powder form so I recommend using a food processor. But if you dont have one then you can bash the cookies using a rolling pin.
- Now add 1 cup of milk, instant coffee powder to the powdered cookies. Mix gently until everything is well incorporated. Make sure that you do not over mix the batter as that results in gluten formation and it can make the cake stiff.
- Next add baking soda and 1 tbsp of milk. Give it a quick stir.
- Add the cake batter to the greased baking pan. Bake it for 25-30 minutes or until the cake is done. At around 25 minutes do a quick toothpick test to check if the cake is done. Insert a toothpick in the center of the cake and take it out. If the toothpick comes out clean then the cake is done. If you see cake pieces on it then bake the cake for a couple minutes and repeat the toothpick test.
- Once the cake is baked, take it out of the oven. Let the cake cool down before unmolding it. Do not unmold the cake while it is hot. I usually let the cake cool down by first putting the cake pan on a wired mesh. After 10-15 minutes I unmold the cake from the pan and again let it cool down completely on the wired mesh. We need to have cake at room temperature for frosting otherwise the frosting will melt down.
Steps to make cream cheese frosting:
- In a bowl, take room temperature cream cheese and unsalted butter.
- Using a hand mixer, beat them until they are well blended.
- Now add sugar and vanilla extract. Beat it again until the frosting looks light, creamy and pale.
- Frosting is ready. Keep it in refrigerator until the cake is ready for frosting. Take out cream cheese frosting 10 minutes before using it, bring it to room temperature and then use it.
Steps to make chocolate ganache:
- In a microwaveable bowl, take unsalted butter and milk.
- Microwave them for 30-40 seconds.
- Now add chocolate chunks/chips to the milk-butter mixture. Do not mix but let the chocolate sit in the liquid for a couple minutes.
- After 2-3 minutes, start mixing everything gently.
- As you mix, the chocolate starts to melt. The residual heat from milk and butter is good enough to melt the chocolate without burning it.
- If you feel there is a lot of unmelted chocolate and the mixture has cooled down then microwave it for no more than 10 seconds. Once again mix it until all the chocolate is melted and you are left with a shiny ganache.
- Do not use the chocolate ganache immediately. Let it sit for 5-7 minutes before using it so it has come to room temperature.
Steps to frost the cake:
- Once the cake has completely cooled down, cut it horizontally into two halves.
- Now brush/sprinkle plain water or sugar syrup on the inner side of each half. This will keep the cake moist.
- Next spread cream cheese frosting on one half. Put another half on top of the frosted layer.
- Apply cream cheese frosting on top and sides of the entire cake.
- Try to even out the frosting on all sides to the best of your abilities. Do not worry if there are irregularities since we will pour chocolate ganache on this. So any irregularities will get hidden in the final outcome.
- Refrigerate the frosted cake for 15-20 minutes. It should be chilled before pouring chocolate ganache on it.
- Once the cake is cool enough, freely pour the chocolate ganache on top of it and spread the ganache evenly using spatula.
- If the ganache has become too thick to pour then heat it in the microwave for 10 seconds and give it a quick stir. It will come back to a pouring consistency. Since our cake is chilled, the frosting will not melt. This will also help the ganache to set immediately.
- Put the cake in the refrigerator again for 15-20 minutes. After that it is ready to serve.
- You can further decorate the cake using sprinkles, fresh fruits, dusting cocoa powder or powdered sugar. Basically it is a blank canvas and you can use your creativity. I leave the cake at this stage since this is easy for me and the cake looks simple and clean.